
If you want to know how to sharpen your dog clipper blades properly and what tools you need for this procedure, then check out this definitive 2025 guide.
If you have invested in a professional dog clipper, you have already done a lot to make your dog’s coat beautiful and well-groomed.
However, the clippers and blades need to be cared for from time to time, and sharpening is an important part of this.
Don’t worry; this procedure isn’t as complicated as it sounds at first. Armed with my many years of experience and the help of experts, I have put together a detailed guide for you.
In my article, you can find out what tools you will need to sharpen your dog clipper blade and the specific steps.
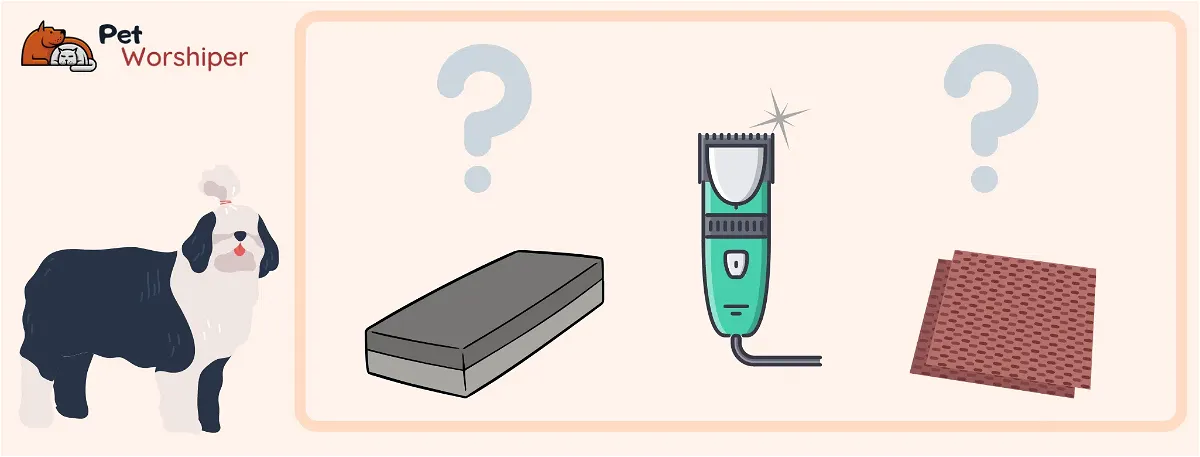
What you need to sharpen your dog clipper blades

If you follow the instructions in my article, you will find that sharpening the clipper blade is not that complicated. However, first of all, we need to clarify what tools you will need for the procedure. Here is the list:
Your dog clipper
For the complete procedure, you need to prepare your home clipper and the instructions that come with it. You need the latter because following the manufacturer’s advice is less likely to make mistakes.
But don’t worry, following my present guide will give you enough knowledge to do the sharpening.
Screwdriver with a box
You will obviously need a screwdriver since the blades are usually attached to the clippers with head screws.
Manufacturers will sometimes indicate the size of the screwdriver required for disassembly. However, if that’s not the case, it doesn’t hurt to have a set, and you can choose the most appropriate one from several sizes.
You may want to keep a small box (or toolbox) with you to put the tiny screws in for sharpening.
Clipper brush
Before cleaning, you should brush the blades to get rid of hair and accumulated debris. There are dog clipper kits that include such brushes, but of course, you can get them separately.
Clipper blade cleaning solution (with a bowl)
After sharpening, it is essential to clean and de-rust the blades. It is best to get a cleaning agent specifically designed for this purpose. The major, trusted brands (Andis, Oster, Wahl) all have products for this purpose.
If you want to soak the blade in the cleaning agent, you will also need a bowl for this.
Some people perform the cleaning process before the procedure too.
Whetstones
Whetstones are the most popular sharpening tools because they are inexpensive and readily available. You can get them online or from a local store.
You will need two types of these stones: one with a coarser grit (3-4000 grit) and one with a finer grit (7-8000 grit).
In addition to whetstones, the grinding wheel and the lapping wheel are two common sharpening tools. These provide a professional solution but are much more expensive.
If you have ceramic blades, I recommend diamond stone for sharpening.
Some people use sharpening paper to sharpen, but I find the above methods safer.
Clipper blade oil
After the sharpening process, not only do you need to clean the blades, you also need to oil them. Lubrication avoids rust. Choose an oil that has been developed for clipper blades, just like you did with the cleaning solution.
A small cloth, or a towel
When you start sharpening the blades, tiny metal shards can break off. Therefore, you should keep a dry towel or piece of clothing with you to wipe these pieces off.
A little water to spray
Some whetstones work best when wet. The best tool for this is a water bottle with a spray head.
Sharpening your dog clipper blades: step by step
Dull clipper blades not only make the cut less effective but can also cause irritation to your dog, like clipper burn.
Therefore, you will need to do the sharpening from time to time, and this section will help you with that. By following the steps below, the positive result will not be missed.
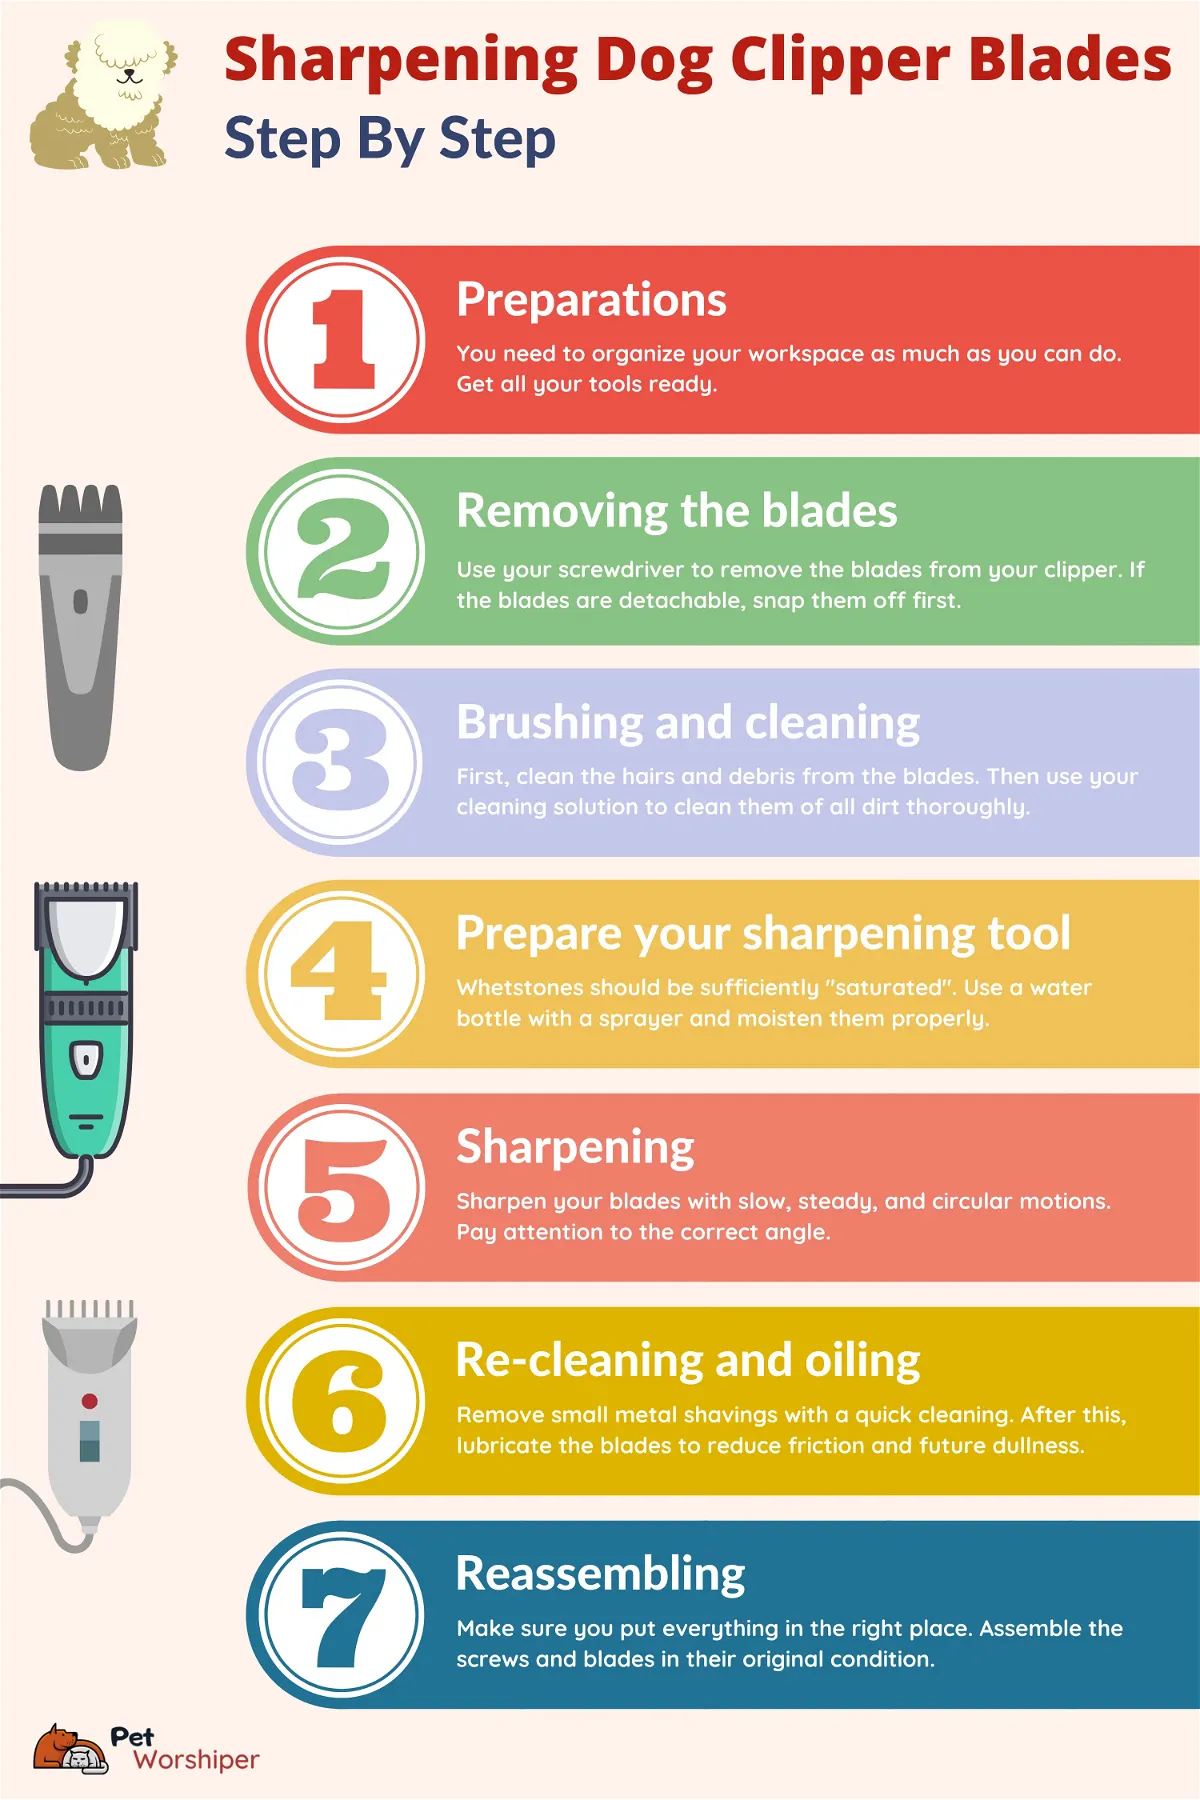
1. Preparations – workspace, tools, etc
You don’t need a lot of space, but it should be as organized and organized as possible. You will work with small parts during disassembly and cleaning. Congestion and clutter can lead to the loss of these tiny parts.
Put the boxes, bowls, and tools in a conspicuous place. It is crucial to perform the entire procedure in daylight or proper lighting.
2. Remove the blades from the clipper
Make sure your clipper is unplugged, and do not accidentally turn it on during disassembly.
Before you begin disassembly, it is a good idea to memorize how the blades and the screws are located.
This step is essential as you should not want to put your tool together correctly after cleaning and sharpening. You can also take a picture with your mobile phone.
Use a screwdriver to remove the blades from the clipper. There will usually be two to three screws. Don’t forget to put them in a safe place in a small box.
Sometimes the blades are held in place by a snap lock. In this case, pressing the appropriate tab will release the blades.
Note that the blade assembly actually consists of a larger exterior or stationary blade and a smaller reciprocating blade. Remember to clean both and sharpen them for the perfect result.
3. Brushing
Use the clipper blade brush (or any toothbrush) to brush the blades and the clipper head. Be careful not to leave any hair or other debris or dirt on the blades.
4. Cleaning the blades
Cleaning is one of the most critical steps. After all, even the tiniest dirt can prevent the blades from working correctly.
Moreover, sometimes there is no need for sharpening, and the problem all along was that the blades were too dirty. If this is the case for you, feel free to reassemble the clipper after a thorough cleaning.
The exact way to use a cleaning agent depends on how soiled your blades are. In the case of minimal dirt, it is probably enough to wipe them with a cotton ball soaked in the solution.
However, if you are dealing with tough dirt, it is a good idea to soak the blades in the cleaner for up to hours.
Another great way is to dip the blades into the solution when assembled and turn on the clipper for 15-20 seconds. However, this method is not permitted for all products and may not remove all dust and dirt from the blades.
Whichever option you choose above, be sure to wipe the blades with a dry cotton swab or towel.
5. Prepare your whetstones or other sharpening tools
As I mentioned above, you will need two types of whetstone (4000 and 8000 grit). Use a diamond sharpener for ceramic blades.
You need to make sure the stones are “saturated” so you will need some water. Sprinkle or spray a little water on their surface and see what happens.
If the stones immediately absorb the water, they are not soaked enough. Continue moistening until the whetstones absorb the moisture more slowly.
If the stones are adequately saturated, you can move on to the next step. Before that, however, you need to make sure of certain things.
Whetstones should be fixed during sharpening, or at least provide a non-slip surface. A towel is perfect for this. In addition, make sure the whetstone you are using is wide enough to fit your clipper blade.
6. Sharpening your blades
Preparations, cleaning, and wetting whetstones are much more time-consuming than the sharpening procedure.
Use the coarser 4000 grit stone first. Place the blade on it so that the angle is the same as that of the blades. It’s not good to change the angle because it leads to inefficient cutting.
You will need some practice to get to the correct position. Once you have it all, try to keep the right angle.
With gentle but steady pressure, move from one side of the stone to the other. Then raise the blade and start the whole movement again. So you will go practically in a circle.
You will need to repeat the above movement about ten times, but make sure the blade tips are shiny.
You can check during the procedure to see if the whetstone is dry. If so, spray another dose of water on it.
After the coarse stone, repeat the moves listed above with the 8000 grit stone as well. Then switch to sharpening the other blade. At the end of the process, wipe the blades to remove small metal chips.
7. Re-cleaning the blades
After sharpening, you may want to do the cleaning again, but don’t worry, it won’t take long. A thorough wipe with a cotton ball soaked in the cleaning agent or a soak for 20-30 seconds will suffice. Then rinse and dry the blades, and oiling may come.
8. Oiling the blades
Oiling the dog clipper blades is inevitable. After all, lubricated blade teeth are less friction, which slows down dulling and overheating.
You don’t have to use a lot of oil; 3-4 drops will be enough. Too much oil attracts dust and debris.
Apply a few drops to the inside of the larger blade under the teeth. Then one or two drops can come into the groove securing the smaller blade.
Distribute the oil evenly and ensure the outside surface is not wet or slippery. If this happens, wipe off any excess oil with a dry towel.
9. Reassembling the blades and the clipper
After completing the above steps, reassemble the clipper.
Remember, all screws and both blades must be in place. This can be helped by the initial memorization or the photo taken by your phone.
By default, if screws secure the blades, use a screwdriver. For a snap lock, just snap them back into place.
Don’t forget to test your work. You may not have sharpened perfectly, and your clipper may not be working correctly.
In this case, repeat the entire procedure from the beginning.
If despite sharpening several times, the dog clipper continues to pull on your dog’s hair, you probably need new blades.
Further tips to sharpen your dog clipper blades
Believe me, buying a professional clipper can be one of the best investments for you. This way, you can strengthen the bonding with your dog and save a lot of money in the long run.
However, you should equip yourself with the proper knowledge. The correct blade sharpening technique will help you use your grooming tool for a long time. I have collected the following tips for you:
Give yourself time
Professional groomers learn the craft for months (possibly years), along with trimming and sharpening. So you don’t have to rush yourself. Practice your movements nicely and believe me, the results will come.
Learn from experts or tutorials
It is possible that despite the above steps, you are still not confident enough about clipper blade sharpening. Learning is not a shame, and when it comes to grooming, it’s worth taking the tricks out of the best places.
Ask your local groomers how they sharpen their blades, but you can also find plenty of tutorial videos online.
Contact the manufacturers
Some manufacturers undertake to sharpen the blades they manufacture. In any case, you should contact the brand to find out what guarantee and commitment it has made.
Don’t forget your dog clipper’s user manual
Whether it’s disassembly, reassembly, or other technical issues, the user manual can be a massive help to you. Before and after the blade sharpening, don’t forget to keep it with you.
Keep tiny parts in a safe place
If your clipper’s blade is secured with screws, you need to make sure that they do not disappear during the sharpening procedure. After disassembly, put them in a safe place. An example is a small box or bowl.
Use gentle movements after sharpening
Remember that no matter how experienced you are, you may not have been able to sharpen the blades perfectly. That’s why you should first test your work with slow and gentle movements. You don’t want dull blades to pull on your dog’s fur.
Dog clipper blade types
There are several types of blades that can vary from brand to brand or even within a brand. It is important to be aware of this because different designs and materials may require different sharpening methods and tools.
Detachable vs. adjustable blades
The adjustable blades are fully screwed to the clipper. For this reason, you need a screwdriver for all the steps. For detachable blades, the first step is to snap the blades off the clipper and then use a screwdriver.
Most dog clippers without cords manufactured by Wahl have adjustable blades, while Andis products typically operate with detachable blades.
Skip tooth and fine-tooth blades
Skip tooth blades are ideal for matted coats. Of course, in cases like this, you might also want to know what heavy-duty dog clippers I recommend for thick coats or matted hair. This way, you will be able to prepare for the challenges fully.
Fine-tooth blades are used on less problematic regularly clipped coats.
Sharpening methods are similar for both types, and you may want to pay attention to how the blade tips gloss.
However, you should note that the result may differ due to the different distances between the teeth.
Edgings and materials
Clipper blades are usually made of stainless steel or ceramic. Manufacturers can also add materials (as a mix or finish) such as silver, chrome, titanium, or carbon.
These can all strengthen the blades in some way, especially carbon and titanium. A standard whetstone may not be enough for the latter alloys, but you will need a diamond sharpening tool. The situation is similar for ceramic blades.
There are three edgings for clipper blades:
UltraEdge blades: It is a very resistant type made of carbon-infused steel. However, it heats up quickly, which means that this type of blade dulls relatively quickly.
CeramicEdge blades: This type is made of ceramic, and resistant to heat and dull for a long time. This way, you will need sharpening much less often if you choose this type.
ShowEdge blades: This type has been developed for those who want to start their little friends at dog shows. ShowEdge blades give a real smooth finish to your dog’s coat.
Does the size of the clipper blades affect the sharpening?
Basically, the size of the blades does not affect sharpening, but for smaller blades, you should make more careful movements.
Otherwise, the most common blade sizes on the market are 3, 4, 5, 7, 9, 10, 15, 30, 40, and 50. The higher the number, the more precise the cut because the shorter your dog’s coat will be.
Check out my clipper blade charts guide to know the cut lengths that different blade sizes can give you.
Frequently asked questions
I think I have described in detail everything related to the topic. However, I will answer questions that often arise in pet owners below.
How often should my dog clipper blades be sharpened?
The frequency of sharpening depends on several factors. These include your dog’s breed and coat type, what kind of blade you use, and your grooming habits. But basically, I can say that you may need such a procedure up to 2-3 times a year. Of course, this number applies to professional groomers who shear the hair of several dogs every day. Regular users need to sharpen much less often than this.
After sharpening, how much oil should I apply to the dog clipper blades?
Lubrication is essential for your clipper to work correctly, but you should not overdo it. Excessive oil can cause a lot of dust and other contaminants to get on the blades, which can be a problem in the long run. Usually, 2-3 drops are enough for full functioning.
How do I know if my dog clipper blades are dull?
If your dog clipper is not working correctly (snagging and tugging at the coat), it is time for a sharpening or blade change.
Do I need separate dog clippers for different breeds?
Because different breeds have different coats, they may need different clippers. The following guides can be very helpful in this:
My dog is terrified of grooming. What to do?
If your dog is frightened by sudden noises and vibrations, you may want to invest in a silent dog clipper or manual clipper. These tools are handy in many cases and not so expensive. Also, make sure you move in gradually with the introduction of grooming, and don’t forget to reward your dog. The finest treats are essential in this case.
Final words
Sharpening your dog clipper blades is a critical but impossible task. Studying this guide will help you develop your sharpening skills to a master’s level.
Of course, you will need to practice for this.
But remember, you can’t sharpen your blades any number of times. You will need replacement ones after a while.
Regular cleaning and oiling can significantly extend the life of your blades.